Εμφάνιση αναρτήσεων με ετικέτα how to. Εμφάνιση όλων των αναρτήσεων

Τετάρτη 16 Οκτωβρίου 2013

How to Photoshop Yourself Into a Vampire

Snow-Vampire-final

As we approach Halloween and get the chance to dress up in our favorite costumes, there are plenty of opportunities for spooky fun — especially if you have Photoshop handy.
In this quick tutorial we’ll show you how to turn yourself into a vampire with some simple tricks.
What you'll need: Find a photo or use your own. Also, grab some creepy cat eyes and blood brushes.

1. Choosing the Photo

Take a photo of yourself. If it’s easier, get someone to help you, as you want to get the right lighting and composition.
Once you’ve got the shot you like, bring it into Photoshop and label the layer "Face."
face

2. Adjusting the Skin

Now, as a vampire’s skin is pale, we need to remove the color from her face. To do this, we’re going to create a mask so that we can add color to the rest of the image. Select the "Face" layer and choose "Hue/Saturation" under the "Create new fill or adjustment layer" option. Pull the Saturation slider back to “-87."
sub2

Using the Eraser Tool with a soft brush (make sure the color palette is set to white), carefully remove any masked areas that are covering sections of the photo you want in color.
In this photo I’ve kept the hair, eyes and lips in color. Depending on the level of detail you want, you will have to change the brush size to achieve the desired effect.
sub3

Now that you have removed the color, it's time to enhance the shadows around her face.
Select the face layer. This time, instead of choosing "Hue/Saturation" under the "Create new fill or adjustment layer" option, select the "Levels" option and move the sliders to enhance the shadows on the face. You can see the settings I used in the image below.
sub4

3. Vampire Eyes

Once we have the desired color and shading on the face, it's time to create the vampire eyes. You want something different from the standard human eye; I’ve decided to use a cat’s eyes from a photo I found.
cat-eyes

Select an area around the cat’s left eye using the Rectangular Marquee Tool. Copy and paste the eye into your previous image and label the layer "Left Eye." Add a "Layer Mask" to the Left Eye layer and erase the area around the eye to match the human eye. Once you’ve done that, you may have to resize the eye.
eye2

Now that we have the eye in place, we need to enhance a little. Open up the "Layer Style" panel and select the "Inner Shadow" style. Use the image below as a guide.
eye3

It’s looking good, but we want the image to be a bit more vibrant. Select the Left Eye layer and choose "Vibrance" under the "Create new fill or adjustment layer" option. Under the properties, set the vibrance to “+85” and the saturation to “+100."
eye4

The left eye is now complete! Simply duplicate the Left Eye and Vibrance layers to create the right eye and move it into the appropriate position. You may have to resize and flip the image to make it fit again.
We’re starting to build up a selection of layers, so it might be a good idea to organize a few. I’ve decided to put the eyes into a separate group.
eye5

4. Vampire Teeth

The next step will focus on the vampire teeth. We’ll start by creating a simple triangle shape with the Pen Tool. You can call this layer "Left Tooth."
teeth1

Once you’ve created the shape, erase some of the edging around the top, then apply the following styles to the layer:
teeth2


teeth3


teeth4

Now that you have created your tooth, you’ll need to duplicate this layer (naming it "Right Tooth") and place it appropriately on the other side of the mouth. You may have to erase some more edges to make it fit.
The teeth are starting to look good, but they’re a little too “shiny” for the photo. Depending on the quality of the self-portrait, you may want to add some noise to the teeth. First, make sure to Rasterize the teeth layers (right-click a layer and choose "Rasterize Layer"), then from the Filter menu choose Noise > Add Noise and follow the settings in the below image.
teeth5

5. Blood

Depending what effect you are going for, you can also add some blood stains to the teeth. For most of the blood effects in this tutorial, I used a brush available for download online.
There are plenty of free brushes online, but make sure to ask permission to use them — some may require payment or credit for use.
To add the blood effect to the teeth, hold Control and click on the teeth layer you want to add blood to. Simply choose the appropriate brush and fill in the rest.
blood

No vampire is complete without a bit of blood dripping from her mouth. You can create this effect by simply adding different shades of red around the lips.
First, create new layer called "Blood around mouth" and begin to color in something similar to the image below. Mix shades of red to get a patchy effect and finally change the blending mode on the layer to give the impression the blood is actually on the skin.
blood2

Lastly, I wanted to create a dripping blood effect running from the vampire’s mouth. I decided to use the blood brushes pack I downloaded earlier. Label this layer "Blood drip" and shape the drip in a way that looks convincing.
blood3

As you can see, the blood isn’t matching the image very well at the moment, but with a few style changes we can fix that. Use the following styles below.
blood4


blood5


blood6

Now that we’ve finished, we should have our vampire! Muahahahahahahaha...


Snow-Vampire-final

Παρασκευή 11 Οκτωβρίου 2013

How to Hide All the Dirty & Potentially Embarrassing Photos & Videos Lingering in Your Android Gallery


Regardless of how great your friends and family are, they'll more than likely go through your photographs if they had the chance. Hell, if my friend were to leave his/her phone lying around, I'd go through it—no doubt.

So, if you want to protect yourself and your embarrassing moments from people like me, follow along below, because I'm going to show you how to easily hide your photos and videos on your Samsung Galaxy Note 2 or other Android device.


Hiding Your Gallery Pics with Gallery Plus

To lock down our pics, we'll be using the free Gallery Plus - Hide Picturesapp from AppMobilePlus, available on Google Play. This makes it easy to password-protect and hide all any tempting pics and videos you may have in your stock gallery


Setting Up the Password Protection

After you download and install the application, you'll be prompted to enter a pattern password (twice), and then a security question (in case you forget the pattern password).

Hiding Photos & Videos Using the Gallery Plus App

Now that you're done inputting your password, it's time to hide some media. To do this from Gallery Plus, you can hold down on an entire folder in Stock Gallery and then press the eye icon with an X through it in order to send it to the Hidden Gallery.


If you only want to hide individual pictures and videos, you can do the same as above—just hold down on the pic/vid you want to hide (until it's checked) and then send it to Hidden Gallery.

Hiding Photos & Videos Right from the Stock Gallery

You can also hide pictures and videos directly from your stock gallery. All you have to do is select what you want to hide, press the share icon, and send it to Gallery Plus. This will send it to the application, and in turn, hide the photograph.

Hiding Gallery Plus from Snooping Eyes

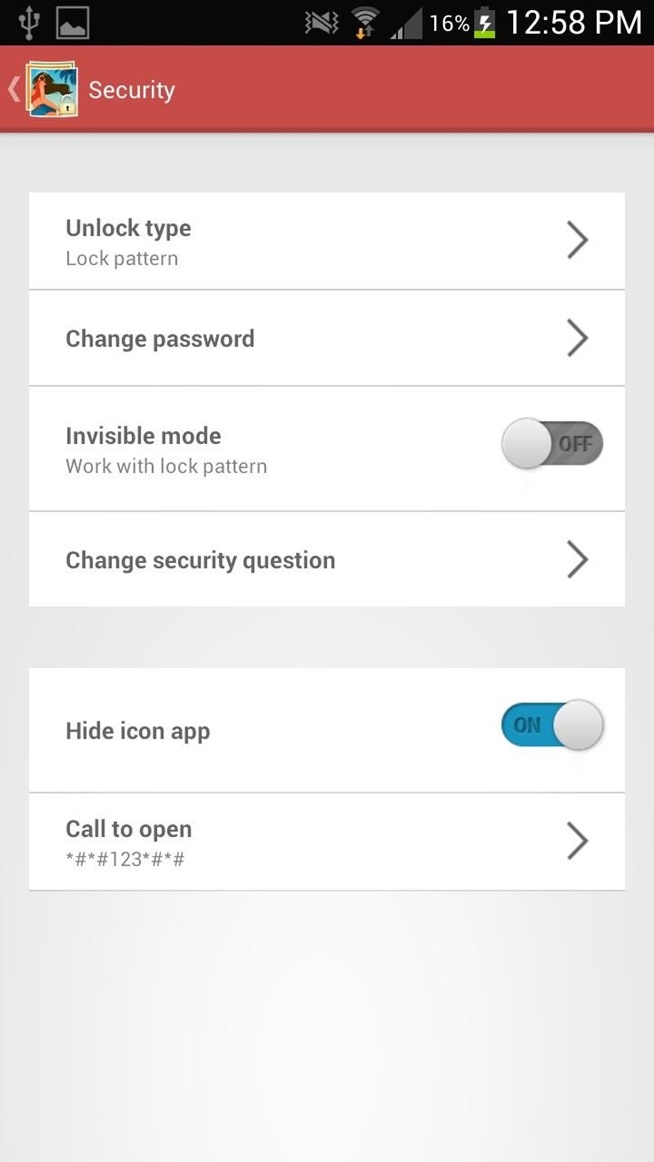
If you want to be even sneakier with your pictures, you can hide Gallery Plus itself. Just head over to Security and then turn Hide icon app on.


Once it's on, you won't be able to open the application, instead showing "Application not installed" on the screen. To open it, just call *#*#123*#*#, which will take you directly to the app.


Note: You can change the access number in the Gallery Plus settings.
Backing Up Photos & Theming Gallery Plus

If you want to back up all of your hidden pictures, you can do that directly through Dropbox (as well as restore pictures). You can also change where the pictures are stored and change a few settings with the slideshow.


Finally, you can add a bit of your personality to Gallery Plus by changing the theme and choosing one of seven different colors.


Overall, it's a fairly easy app that keeps your nosy friends and family at bay. Sure, if one of your nosy friends or family members happens to be an Android hacker, they could probably break into your hidden gallery, but Gallery Plus is enough to deter pretty much everyone else.

If you want to protect more than just your pics, you can try something like HI App Lock to password-protect any app on your Android device, but if it's just pictures your worried about, Gallery Plus gets the job done well.

How to edit posts and comments on Facebook for Android


(Credit: Screenshot by Ed Rhee/CNET)


Facebook only began allowing users to edit comments on its Web site back in June of last year. You were out of luck if you wanted to edit comments from your Android device, however, until now.

Facebook began rolling out a new update a couple of weeks ago that allowed Android users to finally edit comments and posts. The update should have rolled out to you by now, giving you the ability to make edits from your Android phone or tablet.

To edit a comment, just tap on the comment you want to edit, then choose "Edit Comment." Once you're done editing your comment, tap the Update button and you're all set.
(Credit: Screenshot by Ed Rhee/CNET)

To edit a post, tap on your post, then choose "Edit Post." After editing your post, tap on the Save button. The next time you select your post, you can also view your edit history by selecting "View Edit History."
(Credit: Screenshot by Ed Rhee/CNET)


That's it. Now you can instantly edit that embarrassing post, nonsensical autocorrect, or regretful comment without having to wait until you're in front of a computer.

Τρίτη 1 Οκτωβρίου 2013

Extension lets you switch Firefox tabs with mouse gestures


You are either a keyboard shortcut person or a mouse/touch-pad person. If the latter describes you, I have a Firefox extension that may be of some interest. TabFlip lets you switch tabs with a flick of the mouse.
(Credit: TabFlip/Martijn Joosstens)

After installing TabFlip, you can immediately get to the flicking or, as the developer calls it, flipping action -- no restart is required. To switch tabs, hold down the right mouse button and give the mouse a flick horizontally. Flicking to the right moves you to tabs to the right, while flicking to the left does the reverse.

The same action can be performed on a touch pad, too, but with more difficulty and only if you are using a Windows PC. I had no luck with the extension on a MacBook Pro touch pad, and I found it harder to perform the right-click-and-flick gesture on a touch pad than actual mouse. And while the extension works on a Mac with a mouse attached, the right-click pop-up menu gets in the way. It pops up when you initiate the flick command and stays on the screen even after you arrive at another tab. The right-click menu doesn't surface when using TabFlip on a PC.
(Credit: Screenshot by Matt Elliott/CNET)


There are a few settings of note for TabFlip. Check the box for the Wrap setting, and you'll wrap around from either end of your tabs to the other side instead of hitting a dead end. The Scroll Flipping setting is tempting to enable because it lets you perform a two-finger swipe on a touch pad or touch screen to switch tabs. Unfortunately, it disables the two-finger vertical scroll function you likely use to scroll up and down Web pages. Lastly, if you find you the extension is too sensitive and switching tabs when you don't intend it to, you can adjust the number of pixels a flick must cover to register as a command.

The first two settings are enabled by default. They set the areas -- tab bar or Web page -- where the extension will read your gestures. I don't know why you'd want to use the tab-bar flipping. It's a narrow target to mouse to in order to switch tabs, and the right-click menu gets in the way there, which is doesn't do when performing the same gesture anywhere on a Web page.

(Via Ghacks)

Δευτέρα 16 Σεπτεμβρίου 2013

How to Fix Blurry Photos in Photoshop


It's very easy to get a slightly blurry photograph due to a moving subject, camera shake, or just an incorrect auto-focus, but you don’t have to let that ruin an otherwise terrific picture. All it takes is a little finesse in Photoshop or another photo editing software. This guide covers sharpening a blurry image using Photoshop specifically.


Adjust the image's color and lighting aspects before you sharpen. Sharpening should be the last thing you do to the image before you save it. Since you will lose pixels during the sharpening process, do it only after cropping and tweaking the other parts of the photo.

Keep resolution as high as possible before sharpening. Some digital cameras take pictures with high resolutions. This is beneficial when sharpening because you have more pixels to manipulate. Resist scaling down resolution until after you sharpen.

Flatten layers of your image when you finish adjusting it and make a copy of the new layer. Turn off visibility on bottom layer. You'll keep that one in case you don't like your changes.

Select new layer and start sharpening. Open the Sharpen menu from the drop down Filter list. You'll see a few different sharpening tools and each one has its own merit. Choose the Sharpen one at the top first. Click it and the menu will disappear and your image will be slightly sharper.

Click on the next sharpening tool from the list, Sharpen Edges. This tool identifies the change in pixel patterns and adds contrast to the darker tones at the edges of objects. When you apply this filter, you may notice a distinct change in your image.

Sharpen your image if you took people pictures with the Smart Sharpen filter. This sharpening tool gives you more control over your image by using algorithms to remove previous blurring options. In addition, you can choose the advanced tab and sharpen only highlights or shadows for a custom look. This is a good sharpening filter for faces.

Try Unsharp Mask to control the amount of sharpening while monitoring your image in a preview window. Choose the radius of the sharpening effect as well as the threshold.

Floxglove chatbox